Category Archives: Mailchimp

Synchronizing recipients with MailChimp lists part II

In the last post (Synchronizing recipients with MailChimp lists) we’ve seen how we can fetch the mists that are configured in MailChimp. In this part we’ll add subscribers to the mist and get the chance to unsubscribe users from the same list.

Adding a contact class

If we want to add contacts to our list we’ll need to create new views and alter the home controller in our demo project. In our model folder we’ll add a new class, Contact.

using System;
using System.ComponentModel.DataAnnotations;
using DataAnnotationsExtensions;

namespace MailChimpAPIDemo.Models
{
    public class Contact
    {
        [Required]
        public string FirstName { get; set; }
        [Required]
        public string LastName { get; set; }
        [Required]
        [Email]
        public string EmailAddress { get; set; }
        public DateTime? BirthDate { get; set; }
    }
}

You can see I’ve added 4 parameters, first name, last name, email address and birthdate. I’ve added the ‘Required’ annotation to the 3 required parameters. For the email address I’ve added the ‘Email’ annotation. This attribute is not in the default Annotations class but can be quickly added by adding the ‘DataAnnotationsExtensions’ package from Nuget. Open the Nuget Manager Console and type the following command.

PM> install-package DataAnnotationsExtensions

New lists in MailChimp have default only one required attribute and that’s the email address. You can alter the attributes you want to make required r you can add your own attributes by the web interface. Open up the list you want to alter and choose for ‘Settings – List Field and *|MERGE|* tags’

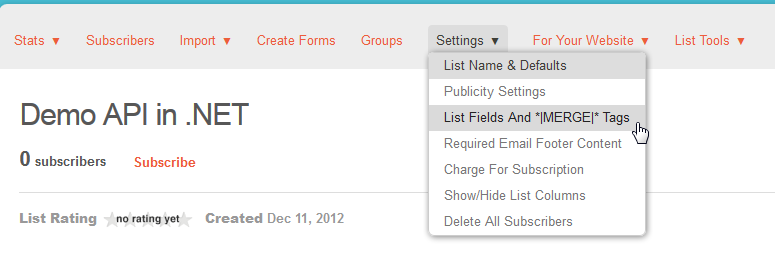
Then you can alter the field as you like. I’ve added the Birthday field and made the first and last name required for our demo list.

Adding the action and creating the view

Now that we have our Contact class we can add an Action in our controller. We add the ‘AddContact’ action twice. Once to deliver the view and one to retrieve the POST information.

using System.Collections.Generic;
using System.Linq;
using System.Web.Mvc;
using PerceptiveMCAPI;

namespace MailChimpAPIDemo.Controllers
{
    public class HomeController : Controller
    {
        public ActionResult Index()
        {
            ViewBag.Message = "Modify this template to jump-start your ASP.NET MVC application.";

            var returnValue = new List();

            var lists = new PerceptiveMCAPI.Methods.lists();
            var input = new PerceptiveMCAPI.Types.listsInput();

            PerceptiveMCAPI.Types.listsOutput output = lists.Execute(input);
            if (output != null && output.result.Any())
            {
                foreach (var listsResult in output.result)
                {
                    returnValue.Add(new McList()
                        {
                            ListId = listsResult.id,
                            ListName = listsResult.name,
                            MemberCount = listsResult.member_count,
                            UnsubscribeCount = listsResult.unsubscribe_count
                        });
                }
            }

            return View(returnValue);
        }

        public ActionResult AddContact(string listId)
        {
            return View();
        }

        [HttpPost]
        public ActionResult AddContact(string listId, Models.Contact contact)
        {
            return RedirectToAction("Index");
        }
    }

    public class McList
    {
        public string ListId { get; set; }
        public string ListName { get; set; }
        public int MemberCount { get; set; }
        public int UnsubscribeCount { get; set; }
    }
}

In the second action we will add the code to add the contact to the MailChimp list. First we’ll have to add the view to enter the contact’s details. Right click on the first ‘AddContact’ method and choose for ‘Add View’. (Don’t forget to build the application first so the new Contact class can be found)

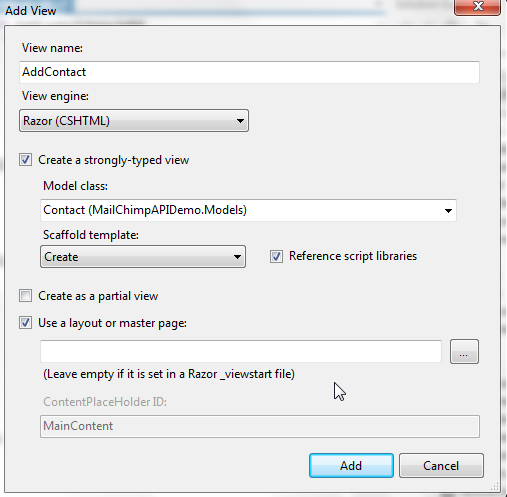
Click ‘Add’ and you’ll see a new view get generated in the ‘Views\Home’ directory. We’ll still have to create a link in the ‘Index’ view to go to the new created ‘AddContact’ view. Because we need the list id we’ll add the link in the table where all lists are listed.

@model IEnumerable
@{
    ViewBag.Title = "Home Page";
}</pre>
<h3 style="text-align: justify;">MailChimpLists</h3>
<p style="text-align: justify;">
@foreach (var result in Model) { }</p>

<table>
<thead>
<tr>
<th>List Id</th>
<th>List name</th>
<th>Subscribers</th>
<th>Unsubscribers</th>
<th></th>
</tr>
</thead>
<tbody>
<tr>
<td>@result.ListId</td>
<td>@result.ListName</td>
<td>@result.MemberCount</td>
<td>@result.UnsubscribeCount</td>
<td>@Html.ActionLink("Add contact","AddContact", new{listId = @result.ListId})</td>
</tr>
</tbody>
</table>
<pre>

You’ll see the new table cell with the Html helper creating a link to the ‘AddContact’ action.

Implementing the POST action

Now we have a working view to add contacts we can implement the wrapper class in the POST action in the ‘HomeController’. In the previous blog post I’ve wrote down the workflow that is used for every API call.

The same workflow is used for every API call:

  • Create the correct main object from the Methods namespace
  • Create the correct input type object from the Types namespace
  • Call Execute on the main object
  • Catch the result in the correct output type object from the Types namespace

We start with creating a PerceptiveMCAPI.Methods.listSubscribe object and we’ll create a PerceptiveMCAPI.Types.listSubscribeInput object that this time will contain a few parameters. Every input class has a sub class ‘parms’ where the necessary parameters can be entered. Here we will add the email address of the contact that MailChimp will use as a primary key and the id of the list where we want to add the contact to.

[HttpPost]
public ActionResult AddContact(string listId, Models.Contact contact)
{
	var subscribe = new PerceptiveMCAPI.Methods.listSubscribe();
	var input = new PerceptiveMCAPI.Types.listSubscribeInput()
	{
		parms = new PerceptiveMCAPI.Types.listSubscribeParms()
		{
			email_address = contact.EmailAddress,
			double_optin = false,
			replace_interests = false,
			send_welcome = false,
			update_existing = true,
			merge_vars = new Dictionary<string, object>(),
			id = listId
		}
	};
	return RedirectToAction("Index");
}
}

Of course we want to add the other values of the contact like first and last name. In the PerceptiveMCAPI.Types.listSubscribeParms class we already implemented the ‘merge_vars Dictionary’. In this dictionary we can add the other values.

	[HttpPost]
	public ActionResult AddContact(string listId, Models.Contact contact)
	{
		var subscribe = new PerceptiveMCAPI.Methods.listSubscribe();
		var input = new PerceptiveMCAPI.Types.listSubscribeInput()
		{
			parms = new PerceptiveMCAPI.Types.listSubscribeParms()
			{
				email_address = contact.EmailAddress,
				double_optin = false,
				replace_interests = false,
				send_welcome = false,
				update_existing = true,
				merge_vars = new Dictionary<string, object>(),
				id = listId
			}
		};
		input.parms.merge_vars.Add("FNAME", contact.FirstName);
		input.parms.merge_vars.Add("LNAME", contact.LastName);
		input.parms.merge_vars.Add("BIRTHDAY", contact.BirthDate);

		return RedirectToAction("Index");
	}
}

After we added all parameters we can invoke the ‘Execute’ method and catch the result in the output class. This class will only contain a bool value (result) if the API call succeeded or not. If it didn’t succeeded we can check the ‘api_ErrorMessages’ parameter of the output object. After the contact is added we’ll send the user back to the lists overview page.

Testing time

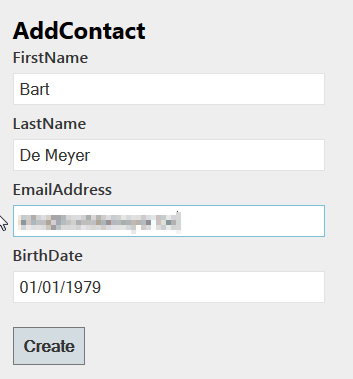
Time to test if our code is working. First of all we’ll run the application and go to the AddContact view by browsing first to the Index view.

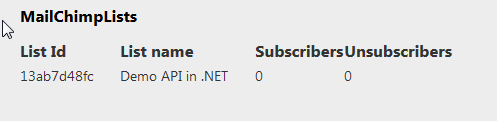
After we click create will be redirected to our Index page where we’ll see the list now contains 1 member.

If we check in the MailChimp interface we’ll see the contact we’ve added by the API call.

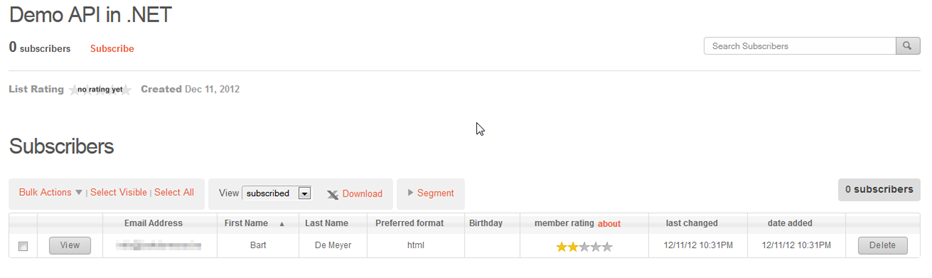
One problem that we see here is that the Birthday is not filled out in this overview. First mistake I’ve made is to add the merge parameter without testing if the nullable DateTime has a value. If we check the API documentation we’ll see that we have to send a date value as ‘YYYY-MM-DD’ and not the European format we’ve used.

input.parms.merge_vars.Add("BIRTHDATE", contact.BirthDate.HasValue ? contact.BirthDate.Value.ToString("yyyy-MM-dd") : string.Empty);
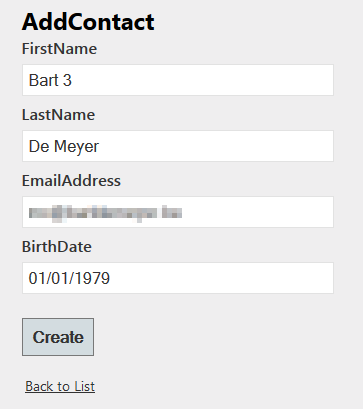
Let’s try again:

And let’s check the MailChimp interface again.

And now we’ll see the correct birthdate.

Source code

You can find all demo’s from this blog post on Github. You’re free to fork or download.

Synchronizing recipients with MailChimp lists

MailChimp is an online service for sending professional looking email newsletters. They have a built in template designer but you can simply import your own designs from file or URL. For small organizations like sport clubs, hobby groups and so one they have a free plan with a maximum of 2000 subscribers and 12000 emails per month. More than enough for what I needed.

Manual synchronizing

MailChimp can have multiple lists to split up your contacts (per company or age group or …). Per list you can use segments to divide that one list. The only down side is that you only can add an email address once. This will give problems if you want multiple members of one family into one list under the same email address (parents email address for example).

People can be added through a registration form that you can alter to follow your website design and MailChimp offers signup by embedded code or by links or by a QR code, … When you’re already working with a contact database you can import these contacts in your list. MailChimp is very strict about importing people in their lists. You can’t use 3rd party lists, no lists you scraped from websites, … Users should be able to opt-in for the newsletter service and should always have a way to unsubscribe. If you don’t follow their guidelines your account will be blocked very quickly. Not without reason of course, they want to avoid that spammers misuse their service.

Importing

MailChimp offers imports from a range of services like Salesforce, Google Contacts, Google docs, Eventbrite, … Next to these services you can upload from file of copy paste from an excel file. And the latter was my manual synchronization every time before I would send out a new newsletter. I’ve created a stored procedure in my SQL database that would return all my contacts with their email addresses, first and last name. After exporting to excel, I could manually copy the 3 columns to the MailChimp web interface. If you’re only sending a newsletter every 3 months, this is doable. But we’re now speeding up on our newsletters and sending at least one per month and during the holidays multiple newsletters per month.

Time to look into the MailChimp API. I didn’t wanted to write a wrapper from scratch and looked into the list of existing wrappers. The first I found was the PerceptiveMCAPI created by Perceptive Logic. I haven’t looked into the other wrappers. I’m not saying the PerceptiveMCAPI is the best, the following is just an explanation how to incorporate the PerceptiveMCAPI into a .NET application.

PerceptiveMCAPI

You can download the compiled code from the codeplex page. Don’t expect a lot of documentation, I could hardly find any blogs or other information how to use their wrapper. I ended up downloading their source code to find all options available. The examples below just alters subscriptions to a list. The rest of the wrapper is similarly build so you can implement the other actions following the examples below.

Add the compiled source code to a folder in your application and add a reference in your project to the DLL. You don’t have to reference the CookComputing.XmlRpcV2.dll that is in the same download.

Updating the Web.config

Before we can use the wrapper we have to add a reference in the config file (web.config for web application, app.config for desktop applications). First of all, add a ‘<section>’ under the ‘<configSections>’ tag. If you don’t have a ‘<configSections>’ tag already add it directly under the ‘configuration’ opening tag. Don’t forget to add a closing ‘</configSections>’ tag.

&lt;/pre&gt;
&lt;section&gt;&lt;/section&gt;
&lt;pre&gt;

After we added the ‘<section>’ tag we can add the ‘<MailChimpAPIconfig>’ tag. There we can enter default values like the API key from MailChimp, the datacenter we want to use and other settings. See chapter MailChimp API key for more information how to get your API key.


Retrieving all our lists from MailChimp

Now we added our default values in the config file we can start to make our first call to the MailChimp API. In this first call we’ll retrieve all the lists we have created in MailChimp. We will need the list ID to add or remove subscribers from that list. For demo purposes I will add the necessary code in the home controller class. In real world application this would be ideally be placed in a separate manager class.

First add the using statement on top of our controller class.

using System.Web.Mvc;
using PerceptiveMCAPI;

The same workflow is used for every API call:

  • Create the correct main object from the Methods namespace
  • Create the correct input type object from the Types namespace
  • Call Execute on the main object
  • Catch the result in the correct output type object from the Types namespace

We need to access the MailChimp lists so we create a ‘PerceptiveMCAPI.Methods.lists’ object as our main object. The corresponding input type object will then be the ‘PerceptiveMCAPI.Types.listsInput’ class.

using System.Web.Mvc;
using PerceptiveMCAPI;

namespace MailChimpAPIDemo.Controllers
{
    public class HomeController : Controller
    {
        public ActionResult Index()
        {
            ViewBag.Message = &quot;Modify this template to jump-start your ASP.NET MVC application.&quot;;

            var lists = new PerceptiveMCAPI.Methods.lists();
            var input = new PerceptiveMCAPI.Types.listsInput();

            return View();
        }
    }
}

To retrieve all the lists we don’t need extra input parameters so we can give the input object as it is to the Execute call. The return type do we catch in a ‘PerceptiveMCAPI.Types.listsOutput’ class.

using System.Web.Mvc;
using PerceptiveMCAPI;

namespace MailChimpAPIDemo.Controllers
{
    public class HomeController : Controller
    {
        public ActionResult Index()
        {
            ViewBag.Message = &quot;Modify this template to jump-start your ASP.NET MVC application.&quot;;

            var lists = new PerceptiveMCAPI.Methods.lists();
            var input = new PerceptiveMCAPI.Types.listsInput();

            PerceptiveMCAPI.Types.listsOutput output = lists.Execute(input);

            return View();
        }
    }
}

After a check if the result is not null we can loop over the result List parameter in the output type. I’ve added a custom MCList class to hold all the results that we can send to the view. There are more parameters in the result object that you can use like statistics etc. These parameters are not documented but generally you can look at the MailChimp API documentation and figure out what is available.

using System.Collections.Generic;
using System.Linq;
using System.Web.Mvc;
using PerceptiveMCAPI;

namespace MailChimpAPIDemo.Controllers
{
    public class HomeController : Controller
    {
        public ActionResult Index()
        {
            ViewBag.Message = &quot;Modify this template to jump-start your ASP.NET MVC application.&quot;;

            var returnValue = new List();

            var lists = new PerceptiveMCAPI.Methods.lists();
            var input = new PerceptiveMCAPI.Types.listsInput();

            PerceptiveMCAPI.Types.listsOutput output = lists.Execute(input);
            if (output != null &amp;&amp; output.result.Any())
            {
                foreach (var listsResult in output.result)
                {
                    returnValue.Add(new McList()
                        {
                            ListId = listsResult.id,
                            ListName = listsResult.name,
                            MemberCount = listsResult.member_count,
                            UnsubscribeCount = listsResult.unsubscribe_count
                        });
                }
            }
            return View(returnValue);
        }
    }

    public class McList
    {
        public string ListId { get; set; }
        public string ListName { get; set; }
        public int MemberCount { get; set; }
        public int UnsubscribeCount { get; set; }
    }
}

When we start up the test application will get the correct results. We see the one list we declared in MailChimp and of course no subscribers yet. (I’ve altered the default view, you can find this changes in the source code)

MailChimp Web interface vs our own web interface


Adding subscribers to our list

Now we can fetch all our lists (just one in this demo) we can start adding subscribers to our list. This will be explained in the following blog post.

MailChimp API key

The API key you can find in the MailChimp web interface under Account – API keys & Authorized Apps.

Click the ‘Add A Key’ button to add a new API key

Source code

You can find all demo’s from this blog post on Github. You’re free to fork or download.