Monthly Archives: March 2012

Using jQuery in ASP.NET applications – part 3 MVC – creating an API

This post will extend the previous post Using jQuery in ASP.NET applications – part 3 MVC.

In the previous post we saw how to create a AJAX call to a specific controller in a MVC application. This will work just fine if you have a small amount of AJAX calls in your application. As your application Is growing you’ll notice that the AJAX calls will get stuck between the other controller actions whom return normal views.

If you want to share functionality between views you’re have repeat the same code in multiple controllers or point non-related views to your controller. This will technically work but conflicts with the MVC pattern.

MVC has a functionality to split up your code in different areas what most of the time is used to split up the administration pages from the rest of your website. Or to reorganize your code to split different use cases. We’ll use this Area functionality to create or own API.

Creating the Area

Note: I’ve switched to Visual studio 11 Beta for the demos. You’ll see the new slick black/white/grey look and feel of VS 1 in the screenshots. Neither less you can do everything underneath in Visual Studio 2010.

Open up the project we created In the previous post. Right click the project and choose ‘Add’. Select the Area option.
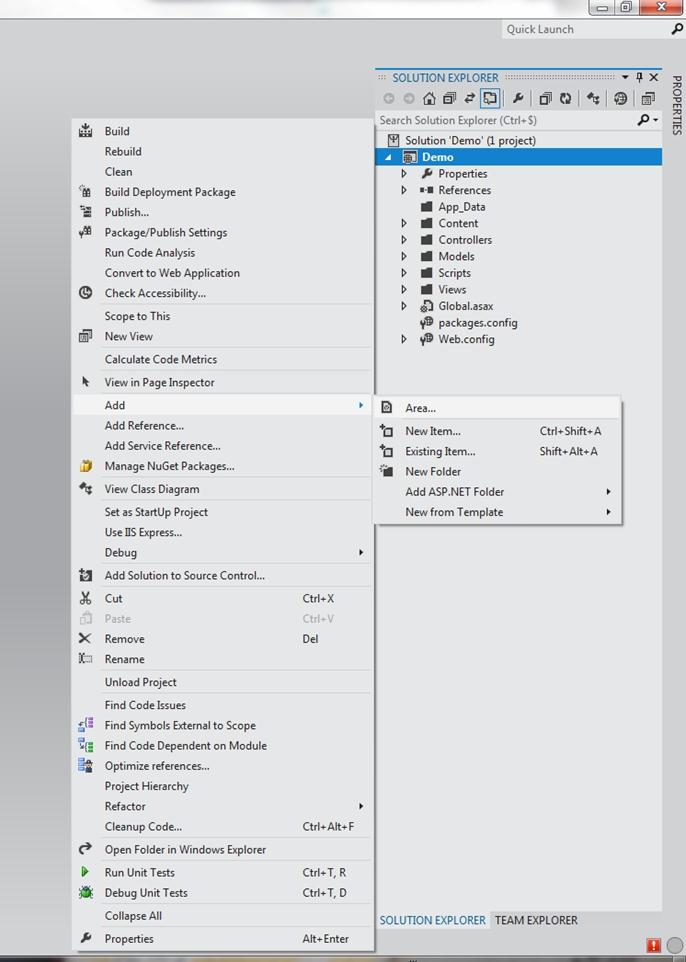
Give the new area the name ‘API’. After clicking Add you’ll see that visual studio create an Areas folder within their you’re ‘API’ area. In this area you’ll see the same setup as in a MVC application. You’ll have folders for controllers, models and views.
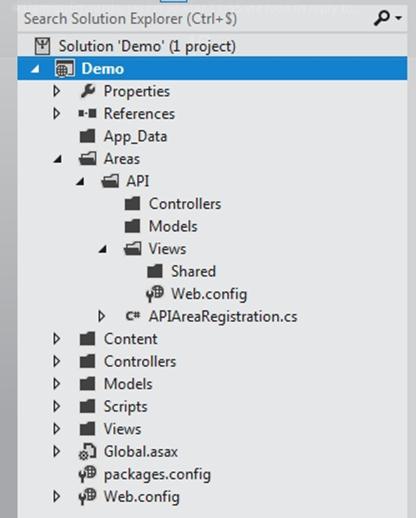
The APIAreaRegistration class visual studio created will register the routes we need to address our area.

using System.Web.Mvc;

namespace Demo.Areas.API
{
    public class APIAreaRegistration : AreaRegistration
    {
        public override string AreaName
        {
            get
            {
                return "API";
            }
        }

        public override void RegisterArea(AreaRegistrationContext context)
        {
            context.MapRoute(
                "API_default",
                "API/{controller}/{action}/{id}",
                new { action = "Index", id = UrlParameter.Optional }
            );
        }
    }
}

In the Application_Start method in the Global.asax file we’ll see the AreaRegistration.RegisterAllAreas method that will take care of the registration of the routes of the different areas when available.

        protected void Application_Start()
        {
            AreaRegistration.RegisterAllAreas();

            RegisterGlobalFilters(GlobalFilters.Filters);
            RegisterRoutes(RouteTable.Routes);
        }

Create a new controller

All our AJAX calls are related to handle books, more specific: add book titles. Therefor it is logical to create a book controller in our API. Ricght click on the controllers folder in our API area and choose for Add controller. Name it BookController and choose for an Empty controller.
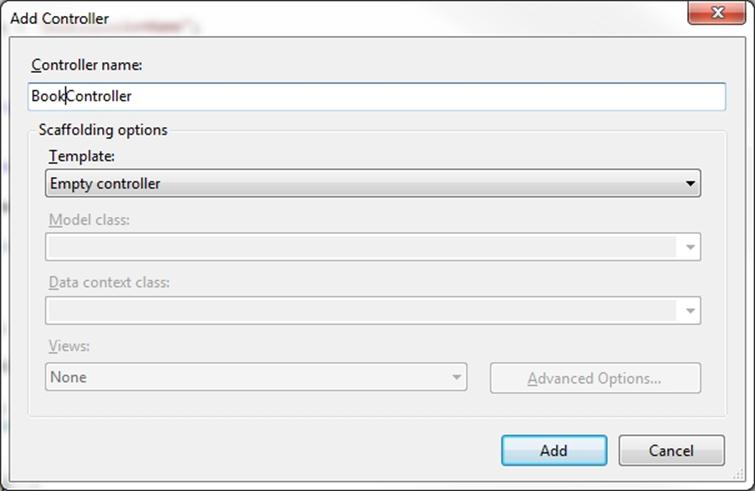
Visual studio will now create the new controller. When created it should contain only an index action.

using System;
using System.Collections.Generic;
using System.Linq;
using System.Web;
using System.Web.Mvc;

namespace Demo.Areas.API.Controllers
{
    public class BookController : Controller
    {
        //
        // GET: /API/Book/

        public ActionResult Index()
        {
            return View();
        }
    }
}

We add the same code we used in our HomeController.

using System.Collections.Generic;
using System.Linq;
using System.Web.Mvc;
using Demo.Models;

namespace Areas.API.Controllers
{
    public class BookController : Controller
    {
        private static string sessionName = "BooksSessionName";

        public ActionResult AddBook(string bookTitle)
        {
            List<Book> books;
            if (Session[sessionName] != null)
            {
                books = Session[sessionName] as List<Book>;
                if (books == null)
                    books = new List<Book>();
            }
            else
            {
                books = new List<Book>();
            }
            Book book = new Book() { BookId = GetNextBookTitleId(), BookTitle = bookTitle };
            books.Add(book);
            Session[sessionName] = books;
            return Json(book, JsonRequestBehavior.AllowGet);
        }

        private long GetNextBookTitleId()
        {
            if (Session[sessionName] != null)
            {
                List<Book> books = Session[sessionName] as List<Book>;
                if (books != null)
                {
                    long ticket = books.Max(t => t.BookId);
                    ticket++;
                    return ticket;
                }
            }
            return 1;
        }
    }
}

AJAX call to the API

After rebuilding our application we can now alter our javascript call so we address the API instead of our home controller. Open up the Home.js file in our scripts folder under the root of the application. Change the URL in the AJAX call to “/API/Book/AddBook”

$(document).ready(function () {
    $("#btnAddBookTitle").click(function () {
        var $bookTitle = $("#txtBookTitle").val();
        $.ajax({
            type: "GET",
            url: "/API/Book/AddBook/",
            data: {bookTitle:$bookTitle},
            contentType: "application/json; charset=utf-8",
            dataType: "json",
            success: function (msg) {
                var $book = msg;
                var $option = new Option($book.BookTitle, $book.BookId);
                $("#lstBookTitles").append($option);
            },
            error: function () {
                alert('Error calling AddBook');
            }
        });
        return false;
    });
});

API is ready for use

With these small changes and build in functionality in visual studio we can easily create an API for all our AJAX calls. If we, for example, need to query for users by an AJAX call we can create a new user controller in our API area and implement the necessary actions.

None of the methods that solely serve AJAX calls are in the other controllers that serve views. We created a nice separation between those.

Next on the blog todo list is the implementation of an AJAX call to a WCF REST service.

You can download the demo project here

Tech session jQuery and ASP.NET

This month we organized a bunch of jQuery Tech sessions for our colleagues at the ABC-Groep where we are working for the company Ace, the Microsoft .NET company of the group. After some introduction to jQuery sessions we had yesterday the jQuery and ASP.NET, how to AJAX session. A few of the subjects that we handled are already on this blog.

The rest of the subjects will follow soon.

Until then here are the presentation and the demos of the jQuery and ASP.NET, how to AJAX session.

[UPDATE] All the source code used in the demo are placed on GitHub:

  • Presentation
  • Demo AJAX vs JQuery
  • Demo ASMX – Web Forms
  • Demo MVC
  • Demo WCF
  • Demo WEB API (including using jQuery Templates plugin and the jQueryUI autocomplete dropdown)

Keep in mind that the demos where focused on the technical implementation of AJAX calls to the different ASP.NET stacks. Therefor there has been no time spend on layout and presentation in the demos.

Creating a thread save queue

We’ve been working on a WPF project for a costumer some time now. One of the requirements of the application was the storage and live streaming of multiple network cameras.

Due to the project setup we decided to split the storage and the viewing part. A client application will stream the camera’s at a rate of 25 frames per second and a server application will record the frames at a rate of 2 frames a second. The camera’s (Mobotix and Axis) can handle the 2 streams and also the network capacity is high enough to create 2 different streams to the cameras.

For the server application I started with implementing the AForge framework (http://www.aforgenet.com/) to handle the camera streams. The Aforge Library has excellent support for audio and video streaming/editing. In our server application we only make use of the AForge.Video namespace. Setting up a stream to a network camera is quite simple.

public CameraStream(string ipAddress, int frameRate)
{
	string url = string.Format(@"http://{0}/control/faststream.jpg?stream=full&fps={1}", ipAddress, frameRate);
	MJPEGStream mjpegStream = new MJPEGStream(url);
	mjpegStream.NewFrame += VideoNewFrame;
	mjpegStream.VideoSourceError += VideoSourceError;
}

private void VideoNewFrame(object sender, NewFrameEventArgs eventArgs)
{
	//Add implementation
	throw new NotImplementedException();
}

private void VideoSourceError(object sender, VideoSourceErrorEventArgs eventArgs)
{
	//Add implementation
	throw new NotImplementedException();
}

Create a MJPEGStream with the URL of the camera as parameter. Attach 2 event handlers, one when a new frame is received, one if an error occurs. The error handling is not part of this post where we focus on asynchronously and thread save usage of a queue. Next part is to implement the event handler when a new frame is received. In the event argument a bitmap is exposed as current frame. We can save this bitmap to disk.

private void VideoNewFrame(object sender, NewFrameEventArgs eventArgs)
{
	//Get the bitmap from the stream
	Bitmap bitmap = eventArgs.Frame;

	//Set the path where we want to save the image
	string path = string.Format(@"d:\Temp\{0}.jpg",DateTime.Now.ToString());
	
	//Save the image
	bitmap.Save(path);
}

This seems allright and if we test with low number of cameras it seems to be running just fine. If we deployed the application to the test environment with 24 cameras we noticed the camera stream stopped every minute for a few seconds. After some debugging we found that the disk where the file was saved had some lack and blocked the saving part of our code for 20 – 30 seconds. Due to our implementation to save directly in the event handler all streams were halted and no images got recorded.

Up to asynchronously saving of the images. If access to the disk was blocked for a reason the image streams have to keep on streaming and the images need to be put in a queue. When the disk is writable again we can empty the queue and start saving to the disk. We first created a helper class to hold the images and to manage the queue. First implementation was a simple list that could hold objects with as parameters a Bitmap and a string (the image and the path where it has to be saved).

public class SaveImageQueue
{
	public List<ImageToSave> Queue { get; set; }
	private Object thisLock = new Object();

	/// <summary>
	/// Constructor
	/// </summary>
	public SaveImageQueue()
	{
		Queue = new List<ImageToSave>();
	}
	
	public void AddImage(Bitmap image, string path)
	{
		lock(thisLock)
		{
			Queue.Add(new ImageToSave(){FilePath = path,Bitmap=image});
		}
	}
	
	public ImageToSave GetImage()
	{
		lock(thisLock)
		{
			return Queue.FirstOrDefault();
		}
	}
}

/// <summary>
/// Helper class to add images and their filepath in the queue
/// </summary>
public class ImageToSave:IDisposable
{
	public string FilePath { get; set; }
	public Bitmap Bitmap { get; set; }

	/// <summary>
	/// Disposes the Bitmap in the helper class
	/// </summary>
	public void Dispose()
	{
		Bitmap.Dispose();
	}
}

In the code above you can see we use a lock object to be sure only one thread at the time can access the List<T>. In the new frame event handler we can just call the AddImage method to add an image to the queue. In a separate thread we will consume the GetImage method to fetch the first image from the queue and when it’s not null we can save it to disk.

If we put this to test we could notice almost directly that the List<T> got locked to much by the 24 camera streams and the consumer to save the images. Our simple solution wasn’t up to this load. When searching for a solution we stumbled upon the white paper “Thread-safe Collections in .NET Framework 4 and Their Performance Characteristics” you can find in this blog post. From the 4.0 version .Net has his built in thread-safe collections that perfect fit our needs. We dropped our own written lock system and added the BlockingCollection from the System.Collections.Concurrent namespace.


/// <summary>
/// Queue to async save images to disk
/// </summary>
public class SaveImageQueue
{
	public BlockingCollection<ImageToSave> Queue { get; set; }

	/// <summary>
	/// Constructor
	/// </summary>
	public SaveImageQueue()
	{
		Queue = new BlockingCollection<ImageToSave>();
	}

	/// <summary>
	/// Start the queue handling. Will check the queue and then saves the images one by one.
	/// </summary>
	public void StartQueue()
	{
		Task.Factory.StartNew(() =>
								  {
									  while (true)
									  {
										  ImageToSave imageToSave = null;
										  if (Queue.TryTake(out imageToSave))
										  {
											  Log.DebugFormat("1: Saving image from queue to {0}", imageToSave.FilePath);
											  try
											  {
												  imageToSave.Bitmap.Save(imageToSave.FilePath);
												  imageToSave.Dispose();
												  Log.DebugFormat("1: Queue is holding {0} images", Queue.Count);
											  }
											  catch (Exception ex)
											  {
												  Log.Error("1: Error reading and executing queue", ex);
											  }
										  }
									  }
								  });
}

/// <summary>
/// Helper class to add images and their filepath in the queue
/// </summary>
public class ImageToSave:IDisposable
{
	public string FilePath { get; set; }
	public Bitmap Bitmap { get; set; }

	#region Implementation of IDisposable

	/// <summary>
	/// Disposes the Bitmap in the helper class
	/// </summary>
	public void Dispose()
	{
		Bitmap.Dispose();
	}

	#endregion
}

As you can see we can now use the TryTake method to fetch an object from the collection and to save the image. The BlockingCollection will take care of the locking of the object and if we want we can add multiple consumers so the queue will be emptied faster. All this is put is a asynchronous Task so the camera streams will not notice anything from the saving of the Bitmap.

In the camera new frame event we can add the committing of the image to the queue. One note here is that you best add a clone of the bitmap you extracted from the event arguments. If the queue is emptied rapidly and you don’t use a clone of the image you’ll get GDI exceptions all around the place due to concurring accessing the same memory address space.

private void SaveImage(string filePath, Bitmap bitmap)
{
	queue.Queue.Add(new ImageToSave() { Bitmap = (Bitmap)bitmap.Clone(), FilePath = filePath });
	bitmap.Dispose();
}